 Save
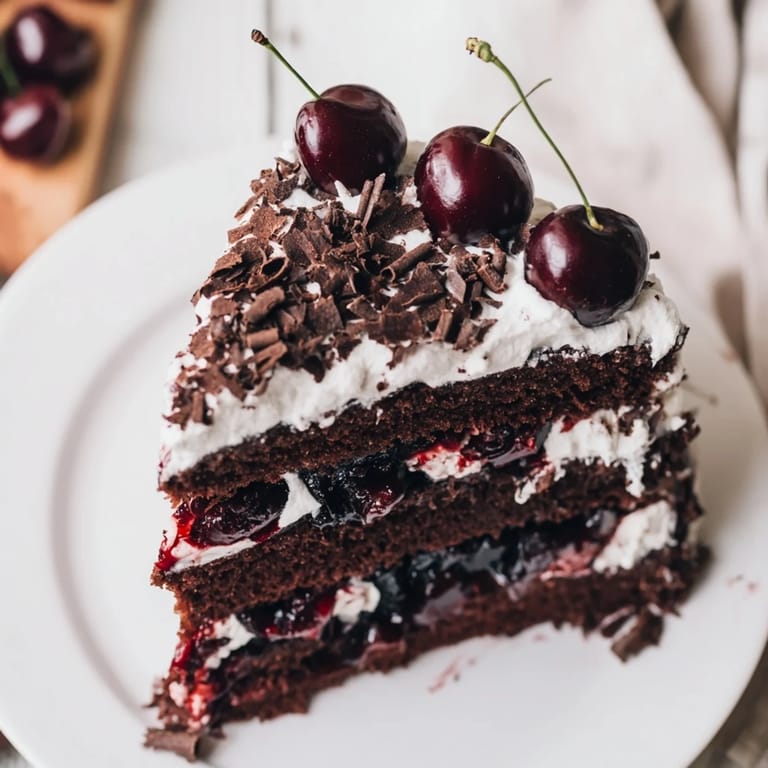
Save The first time I attempted Black Forest Cake, I was standing in my kitchen on a rainy afternoon, surrounded by my grandmother's old German cookbooks, wondering if I could actually pull off something this elegant. My hands were trembling a little as I sifted the cocoa powder—not from nerves, but from the pure excitement of creating something that felt grown-up and impossibly fancy. That cake turned out slightly lopsided and my whipped cream was a touch too soft, but when I tasted that first bite of chocolate, cherries, and cream, I understood why this dessert has been celebrated for generations. It wasn't about perfection; it was about the moment when all those careful layers came together into something genuinely beautiful.
I remember bringing this cake to a dinner party where I barely knew anyone, feeling wildly out of my depth in the social small talk. But the moment I set that cake on the table and people caught sight of those chocolate shavings and glossy cherries, the whole room shifted. Suddenly we were all laughing, sharing forks, and trading stories about cakes our grandmothers made. That dessert became the bridge that turned strangers into friends, and I realized that's when food becomes truly powerful—not because it's perfect, but because it brings people together.
Ingredients
- All-purpose flour (1 cup): The foundation of your cake layers; sifting it with the cocoa and leavening agents ensures there are no hidden lumps that could sabotage your crumb.
- Granulated sugar (1 cup): Dissolves into the batter to create moisture and structure; don't skip sifting it together with the flour for the smoothest possible texture.
- Unsweetened cocoa powder (1/2 cup): This is the soul of the cake; the boiling water you'll add later blooms the cocoa flavor, making it rich and deep rather than flat.
- Baking powder and baking soda (1 1/2 tsp and 1/2 tsp): These work together to lift the cake and keep it tender; they're measured precisely because too much can make it collapse.
- Eggs, milk, oil, and vanilla (2 eggs, 1/2 cup milk, 1/2 cup oil, 2 tsp vanilla): Eggs bind everything, milk adds moisture, oil keeps the crumb tender and moist, and vanilla whispers in the background.
- Boiling water (1/2 cup): This is the secret weapon that makes the batter thin and almost soup-like, but produces impossibly moist cake layers.
- Dark sweet cherries (2 cups, pitted): Fresh or jarred both work beautifully; the juice or syrup becomes the glue holding your layers together with glossy richness.
- Cherry juice or syrup (1/2 cup): This brushed between layers adds moisture and authentic flavor that makes people close their eyes on the first bite.
- Kirsch, optional (2 tbsp): A hint of cherry brandy adds sophistication, but the cake is equally stunning without it if you prefer alcohol-free.
- Heavy whipping cream (2 cups, cold): The texture depends on temperature, so keep it refrigerated right up until you whip it into those glossy, stiff peaks.
- Powdered sugar and vanilla for cream (1/2 cup sugar, 1 tsp vanilla): These sweeten and flavor the cream without deflating it; add them slowly as you beat.
- Dark chocolate for shavings (3 oz): A vegetable peeler works better than a knife if the chocolate is cold; these shavings are the showstopping garnish.
- Fresh or maraschino cherries for garnish: A few jewel-like cherries on top turn this from good to unforgettable.
Tired of Takeout? 🥡
Get 10 meals you can make faster than delivery arrives. Seriously.
One email. No spam. Unsubscribe anytime.
Instructions
- Heat your oven and prepare:
- Preheat to 350°F and grease those two 8-inch pans with parchment paper lining the bottoms. This prevents sticking and ensures you can turn out perfect cake layers.
- Sift and combine dry ingredients:
- Whisk together flour, sugar, cocoa powder, baking powder, baking soda, and salt in a large bowl. This aerates everything and catches any hidden lumps before they wreck your crumb.
- Mix wet ingredients into dry:
- Add eggs, milk, oil, and vanilla to the dry mix and beat until smooth. The batter should be silky and pourable at this point.
- Add the boiling water carefully:
- Gradually mix in the boiling water; yes, the batter will look dangerously thin, but trust this step—it's what creates that moist, tender crumb. Divide evenly between pans.
- Bake until golden:
- Bake for 30 to 35 minutes until a toothpick inserted in the center comes out clean. Your kitchen will smell like a chocolate dream come true.
- Cool with patience:
- Let cakes cool in pans for 10 minutes, then turn them out onto wire racks to cool completely. Rushing this step leads to crumbling when you slice the layers.
- Prepare the cherry filling:
- Combine cherries, cherry juice, and sugar in a saucepan over medium heat and bring to a gentle simmer. Whisk the cornstarch and cold water into a slurry, stir it in, and cook until glossy and thickened, about 2 to 3 minutes.
- Finish the filling with kirsch:
- Remove from heat, stir in kirsch if using, and let cool completely—warm filling will melt your whipped cream layers.
- Whip the cream to stiff peaks:
- Beat cold heavy cream with powdered sugar and vanilla on high speed until stiff peaks form. Keep it chilled until assembly time.
- Slice your cake layers horizontally:
- Using a serrated knife, carefully slice each cooled cake layer in half to create four thin layers. A steady hand and a gentle sawing motion work better than pressing down hard.
- Assemble layer by layer:
- Place one layer on your serving plate, brush with cherry syrup, spread with cherry filling, then a generous layer of whipped cream. Repeat with the remaining three layers, ending with whipped cream covering the top and sides.
- Decorate and chill:
- Top with chocolate shavings and a few fresh or maraschino cherries, then refrigerate for at least 1 hour before slicing. This allows the layers to set and flavors to meld beautifully.
 Save
Save I once made this cake for my partner's birthday and sat in the kitchen watching them take that first bite, seeing their eyes light up in a way that made all the careful layering and timing feel worth every second. That's when I realized baking isn't just about feeding people; it's about showing them you care enough to spend your afternoon making something beautiful and delicious just for them.
The Chocolate Cake Layer
The magic of this chocolate cake isn't just in the cocoa powder—it's in how the boiling water blooms those cocoa solids and creates a batter that seems impossibly thin. When you pour it into the pans, it looks wrong, almost broken, but then something miraculous happens in the oven. The heat transforms that liquid batter into layers so moist and fudgy they practically melt on your tongue, with a crumb so tender you barely need to chew.
Working with Cherries and Cherry Syrup
Fresh cherries are wonderful, but jarred sour cherries in light syrup are honestly the more traditional and elegant choice for authentic Black Forest Cake. The subtle tartness cuts through the richness beautifully, and the juice they come in becomes the perfect brushing liquid between layers. If you're using fresh cherries, make sure to pit them carefully and reserve any juice that escapes for your filling.
Assembly Tips and Tricks
The offset spatula is your best friend when spreading whipped cream—its angled blade lets you work smoothly without deflating all that air you worked to build in. A turntable, if you have one, makes rotating the cake as you frost infinitely easier and keeps your layers level.
- Use a serrated knife dipped in hot water and wiped clean between cuts to slice those thin layers without tearing.
- A crumb coat of a thin whipped cream layer first prevents chocolate crumbs from marring your final frosting.
- Chill the assembled cake for at least an hour before cutting; this lets the layers set and makes slicing clean instead of messy.
 Save
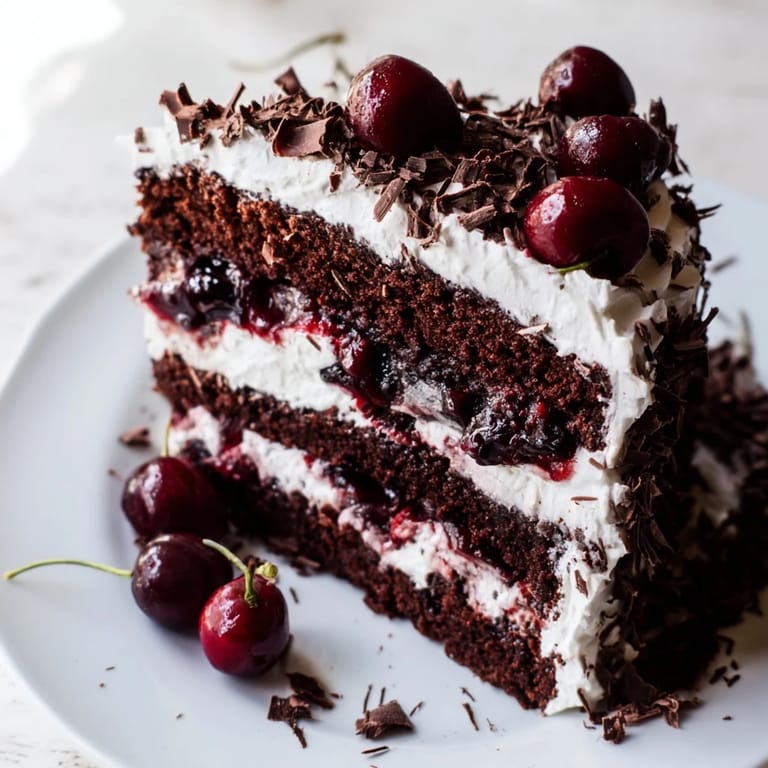
Save There's something quietly perfect about a slice of Black Forest Cake—the way those jewel-like cherries peek through the cream, how the chocolate and cherry flavors sing together. Once you master this, you'll have a showstopping dessert that feels far more complicated than it actually is.
Questions & Answers
- → What type of cherries work best in this dessert?
Dark sweet cherries, whether fresh or jarred, provide the ideal balance of tartness and sweetness.
- → Can I prepare the whipped cream without a mixer?
Yes, but an electric mixer ensures stiff peaks quickly. Alternatively, whisk vigorously by hand until peaks form.
- → How can I achieve thin chocolate shavings for decoration?
Use a vegetable peeler on a cold chocolate bar to create delicate, even shavings.
- → Is there an alcohol-free version?
Yes, simply omit kirsch and substitute with extra cherry syrup for similar moisture and flavor.
- → What is the best way to cool the cake layers before assembly?
Allow layers to cool in the pans briefly, then transfer to wire racks to cool completely and prevent sogginess.
- → How many servings does this dessert yield?
It yields approximately 12 servings, perfect for gatherings or celebrations.